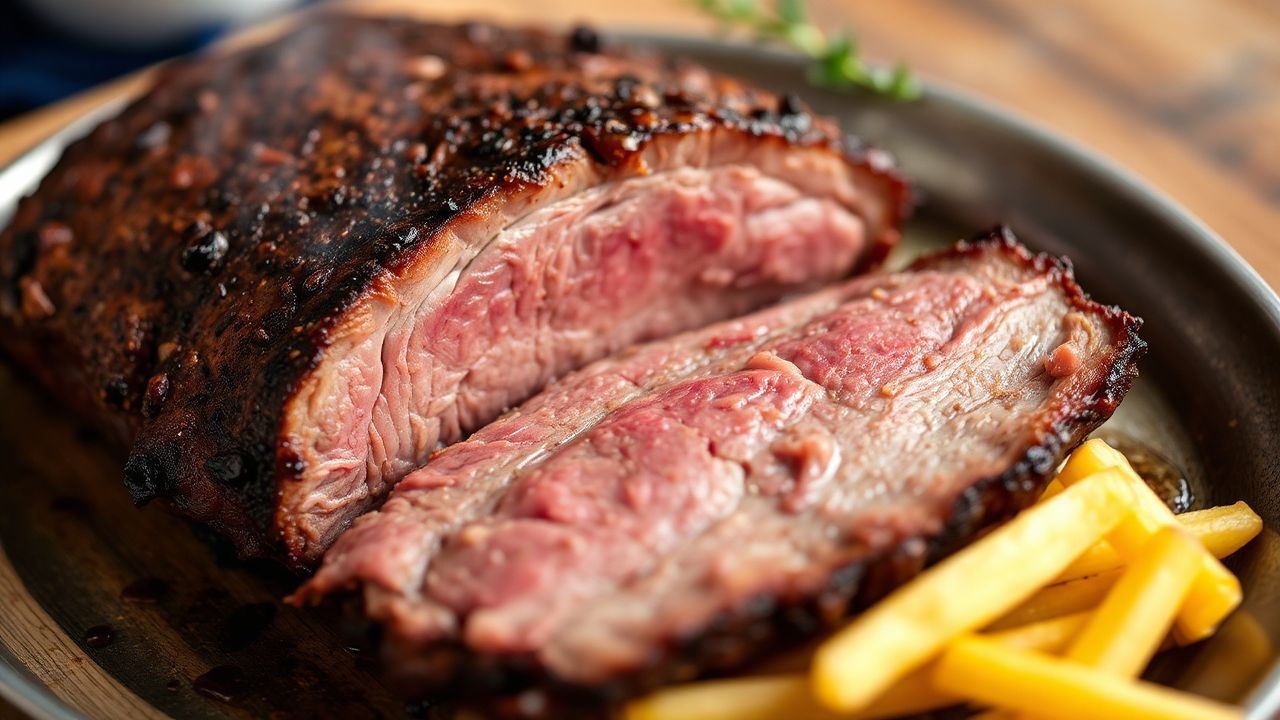
Texas-Style Smoked Beef Brisket wins fans because the flavor feels both simple and precise. You get a peppery bark, a clean oak smoke profile, and meat that slices with almost no resistance.
- Why Texas-Style Brisket Tastes Like Texas
- Pick a Brisket That Can Win (Packer Cut Matters)
- Trim for Even Heat, Not for “Beauty”
- Build a Texas Rub That Performs Under Heat
- Apply Rub and Control the Surface Drying
- Fuel Choice: Oak Is the Base, Hickory Is the Accent
- 7 Steps to Texas-Style Smoked Beef Brisket
- Step 1: Select a Packer Brisket With Good Structure
- Step 2: Trim for Consistent Thickness and Bark-Friendly Edges
- Step 3: Mix the Texas Rub (Salt + Pepper First)
- Step 4: Apply Rub and Rest the Surface
- Step 5: Smoke at 225–250°F With Steady Airflow
- Step 6: Wrap Around 160–170°F to Beat the Stall
- Step 7: Finish to Tenderness and Rest Properly
- Managing the Stall Without Panic
- Slicing Like a Pitmaster: Texture and Presentation
- Common Mistakes That Ruin Texas-Style Brisket
- Practical Timing Plan (So You’re Not Guessing)
- FAQ: Texas-Style Smoked Beef Brisket
At a Glance: Texas Brisket Flavor System
- 225–250°F keeps smoke steady and rendering predictable.
- Salt + coarse black pepper anchors bark and classic Texas taste.
- Wrap around 160–170°F when bark looks set (helps beat the stall).
- Rest 1–2 hours so slices stay juicy and don’t flood the board.
To make this repeatable, you need more than “low and slow.” You need a process: trimming that preserves even thickness, smoke that stays thin and clean, and a finishing plan that respects the brisket’s collagen behavior.
If you treat brisket like a timed recipe instead of a temperature-driven craft, you’ll fight dryness, weak bark, or uneven tenderness. This system fixes that by telling you exactly what to do in each phase—prep, smoke, wrap, finish, and rest.
Why Texas-Style Brisket Tastes Like Texas
Texas brisket flavor comes from two sources working together: smoke deposition and bark formation. Heat drives surface drying and crust-building, while smoke compounds lodge on the moist surface early in the cook.
That’s why bark matters. Bark isn’t just “a crust.” It’s a concentrated mix of rendered fat, rub components, and dehydrated meat proteins that form a dark, savory bark. If your cooker runs too hot, you can build bark before the interior renders; if it runs too cool or too smoky, you can end with bland crust or a harsh finish.
Texas also usually leans toward oak-forward smoke. Oak tends to stay milder and smoother than heavy, resinous woods. For background on why smoke character changes by fuel and combustion, see smoke.
For another useful framework—how connective tissue and collagen behave as heat exposure increases—review collagen. Brisket needs time at the right heat range to turn “tough early” into “tender later.”
The “Bark” Timeline: When It Forms and When It Fails
Bark forms as the rub dries, the surface warms, and fat renders enough to bind rub and proteins. This usually happens during the early to mid portion of the cook, when the brisket still has enough moisture to accept smoke.
Bark failure usually comes from one of three issues: unstable chamber temperature, heavy smoke, or wrapping too early/late. If your bark looks pale by wrap time, you likely wrapped during a period of insufficient surface drying or you used too little airflow.
If your bark looks too dark or bitter, you likely used dirty combustion, thick white smoke, or too much hickory. Clean smoke lets beef flavor stay in front instead of being covered by acrid compounds.
Pick a Brisket That Can Win (Packer Cut Matters)
The Texas-style method depends on the brisket’s shape. A packer brisket includes both the flat and point. Together they balance thickness and fat content so the cook can finish evenly.
A brisket with poor structure forces you into compromises. If one end runs thin, it can overcook while the thick end still needs time. If the fat cap is uneven or too thin, you can lose moisture during long exposure to smoke and heat.
Choose a brisket with consistent marbling and a reasonably uniform thickness from point to flat. You don’t need extreme marbling, but you do need enough internal fat to support long cooking.
To understand why beef’s muscle fibers and connective tissue respond differently across cuts, it helps to know the basics of muscle anatomy. If you want a quick reference point, see muscle.
Marbling and Rendering: What Actually Helps Juiciness
During low-and-slow cooking, fat and collagen both change state. Marbling melts and spreads, which helps keep the meat moist during the long process.
However, brisket also relies on collagen breakdown. That’s why time and temperature matter more than “how long you smoked it” in a vague sense.
If you chase tenderness by overcooking to a high internal temperature too soon, the flat can dry. If you undercook, the meat stays firm in the thickest part. The system below solves that with a probe-based finishing approach.
Trim for Even Heat, Not for “Beauty”
Trimming is not about removing every bit of fat. It’s about controlling thickness so the entire brisket crosses the tenderness zone at a similar pace.
Start by removing hard fat you can easily lift and the thick silver skin you don’t want in the bark zone. Keep a workable fat layer so rendering protects the meat during long smoke exposure.
Over-trimming creates thin edges that dry early. Under-trimming can leave pockets of thick fat that never fully render, which can create greasier bite areas and weaken bark adhesion.
A Simple Trim Target
Use a consistent goal: trim down to a fat layer that is helpful but not bulky. Think “even protection,” not “no fat.” If your brisket has a very thick fat cap, reduce it; if it’s naturally lean, don’t strip it.
Also plan for the flat/point seam. When you cook a packer, you want both sections to finish within a close temperature window. Trimming helps you control that by evening thickness.
If you’ve struggled with uneven slices, trimming is often where the fix starts—before you change rub, wood, or cooker settings.
Build a Texas Rub That Performs Under Heat
Texas-style rub stays simple because it must survive hours of heat and smoke. Salt drives moisture movement at the surface, and pepper gives that classic bark texture and aroma.
For this system, you’ll use a rub that supports bark formation without turning brisket into a dessert. You can include optional spices for depth, but the backbone stays salt and cracked black pepper.
For additional background on how salt affects meat texture, see salt. (Practical note: we’re using it as a flavor and surface-conditioning tool, not as a chemistry lecture.)
The 7-Minute Rub Mix (Dry, Pepper-Forward)
Mix the following until evenly combined:
1/4 cup kosher salt
1/4 cup coarse black pepper (freshly cracked)
2 tbsp smoked paprika
2 tbsp garlic powder
1 tbsp onion powder
1 tbsp ground cumin
1 tbsp chili powder (mild or hot)
1 tbsp brown sugar
This rub works because salt helps anchor crust, pepper builds classic bark crunch, and the mild sweet note supports browning during the long heat exposure.
Apply Rub and Control the Surface Drying
After trimming, apply rub generously. You want coverage on all sides, not just the top. Press the rub lightly so it adheres when the brisket warms and rub paste forms.
Then let the seasoning rest uncovered in the fridge for part of the process. This helps the surface dry slightly, which supports early bark set without requiring constant spritzing.
Keep your seasoning plan realistic. If you only season right before cooking, you’ll still get bark—but it often takes longer for the rub to bond to the surface. When you season earlier, the rub hydrates, then tackifies as the brisket warms on the pit.
If you plan to smoke the next day, a longer fridge hold gives you more consistent surface behavior. That consistency translates into more predictable smoke pickup and bark texture.
Fuel Choice: Oak Is the Base, Hickory Is the Accent
Texas-style brisket typically uses oak-forward smoke. Add hickory in smaller amounts if you want extra richness without overwhelming the beef flavor.
For a starting point, use roughly 70% oak and 30% hickory by wood chunks. Adjust based on your smoker size, airflow, and your personal taste for smoke intensity.
If you want a reference on wood fuel and combustion outcomes, see wood fuel. The same principle applies in barbecue: different fuels burn differently, and different burns create different smoke characteristics.
Thin Blue Smoke Beats “More Smoke”
Smoke flavor builds with time, not with thickness. Thick white smoke often means incomplete combustion, and that can add bitter notes to the bark.
Your goal is steady heat and clean smoke with minimal lid time. Add wood in small increments. When you add too much at once, your chamber can spike and your smoke can turn heavy.
Also keep your fire stable. A fluctuating fire changes both temperature and smoke deposition, which leads to uneven bark and inconsistent smoke intensity.
7 Steps to Texas-Style Smoked Beef Brisket
Use this exact order. Each step supports the next, and changing the sequence usually causes bark problems, moisture issues, or uneven tenderness.
You’re aiming for a brisket that reaches tenderness in the thickest section while the flat still holds juice. The key is not just internal temperature; it’s how the brisket moves through the stall.
Step 1: Select a Packer Brisket With Good Structure
Choose a packer brisket with the flat and point together. Look for even thickness and a fat cap that won’t force you into extreme trimming.
Good structure makes the cook predictable. Without it, no rub or wrap schedule will fully fix uneven finishing.
Step 2: Trim for Consistent Thickness and Bark-Friendly Edges
Remove hard fat and loose silver skin. Then trim the fat cap to an even layer that protects without creating unrendered pockets.
Focus on balancing the flat and point so they finish within a close tenderness window.
Step 3: Mix the Texas Rub (Salt + Pepper First)
Combine your kosher salt, coarse black pepper, and spices until the mix looks uniform. Press it into the brisket so it adheres when the surface warms.
This system assumes pepper-forward bark. If you reduce pepper, you reduce the Texas identity.
Step 4: Apply Rub and Rest the Surface
Coat all sides evenly. Then refrigerate with the brisket uncovered for 4–6 hours, or overnight for stronger seasoning bonding.
Finish with a final short uncovered dry-out before smoking to help bark set. This reduces the need for heavy spritzing.
Step 5: Smoke at 225–250°F With Steady Airflow
Set your smoker for indirect heat at 225–250°F. Use a water pan or equivalent moisture strategy if your smoker benefits from it.
Stable temperature supports even rendering and controlled evaporation. Unstable heat causes overshoot and can weaken bark quality.
Step 6: Wrap Around 160–170°F to Beat the Stall
Brisket often stalls when surface moisture evaporates and the meat’s temperature rise slows. This frequently happens in the 150–170°F region.
When the brisket hits about 160–170°F and the bark looks set, wrap tightly in butcher paper (for bark retention) or foil (for faster moisture retention).
Wrap timing should match bark readiness, not the clock. If your bark isn’t set yet, wrapping early can soften the surface.
Step 7: Finish to Tenderness and Rest Properly
After wrapping, continue cooking until the thickest part reaches about 200–205°F. At that point, the brisket should feel tender when probed.
Don’t rely only on the number. Use tenderness checks in the thickest area. You want the probe to enter with little resistance.
Then rest for 1–2 hours in a cooler or insulated rest box. Resting lets juices redistribute so slices stay moist instead of pouring out.
Managing the Stall Without Panic
The stall feels like failure because the thermometer barely moves. In reality, it’s a physical process: evaporative cooling slows internal temperature rise as moisture leaves the surface.
This is why you wrap in the right window. Wrapping reduces evaporative losses and helps the internal temperature recover toward the finish zone.
When you panic and crank the pit temperature, you often create a bark problem. You can also push the outside hotter than the inside, which leads to uneven texture.
How to Keep the Pit Stable
Check chamber temp every 30–45 minutes rather than constantly. Each lid opening changes airflow and smoke deposition.
Only open when you must add fuel, verify bark readiness, or take a temperature reading. Stability gives you even smoke and consistent rendering.
Probe placement matters. Insert your meat probe into the thickest point of the flat or the most representative thick section you trust. Avoid probing near fat pockets that can read differently.
Slicing Like a Pitmaster: Texture and Presentation
When you slice matters as much as how you cooked. Texas-style brisket should keep its bark intact and present clean edges.
Wait until after resting. If you slice immediately, you risk juice loss and softer bark texture from surface heat.
Slice against the grain. The flat and point have different grain directions, so your knife angle and cuts should adapt.
Proportion and Serving Style
Serve thick slices for the flat and slightly different cuts for the point based on how it pulls. Keep bark facing up on the plate so guests see the pepper crust.
Offer sides with acidity and crunch: pickled jalapeños, simple slaw, and cornbread. This cuts through the fat and salt so the beef flavor stays bright.
For a broader reference on food science tied to slicing and texture, you can review meat and how processing affects structure. In barbecue, the practical takeaway is simple: temperature control and rest control texture.
Common Mistakes That Ruin Texas-Style Brisket
Most problems come from a few predictable areas: wrong smoke quality, poor probe habits, or wrap decisions that ignore bark readiness.
If your brisket tastes smoky-but-bitter, suspect dirty combustion or too much hickory. If it’s tender but bland, suspect low pepper concentration or too little smoke exposure due to poor stability.
If it has bark but slices dry, suspect overheating during the finish or insufficient rest. A brisket can reach a “target temperature” and still be dry if you cooked too far past tenderness or didn’t hold long enough after wrapping.
Quick Fixes by Symptom
Pale bark: wrap later or improve surface drying and airflow.
Bitter bark: reduce thick smoke, add smaller wood increments, and limit hickory.
Uneven tenderness: improve trim thickness and probe strategy; finish by tenderness in the thickest area.
Dry slices: protect moisture, verify thermometer accuracy, and rest longer.
Practical Timing Plan (So You’re Not Guessing)
Plan in phases so you never feel rushed. Brisket rewards scheduling discipline, not frantic adjustments.
A common baseline for a 10–12 lb packer: prep and trimming first, then a seasoning rest window, then a long smoke cook, then a rest.
Baseline Timeline Targets
Readiness: ~30 minutes for trimming and setup.
Seasoning rest: 4–6 hours (or overnight).
Smoke cook: 10–14 hours depending on smoker, brisket size, and weather.
Rest: 1–2 hours for best slice control.
Always build slack. Weather, fuel load, and cooker differences change the real timeline. The system keeps you focused on bark readiness and tenderness rather than just the clock.
FAQ: Texas-Style Smoked Beef Brisket
What makes a brisket “Texas-style” instead of just smoked brisket?
Texas-style brisket usually features oak-forward smoke, a pepper-forward rub, and a long low-and-slow cook aimed at developing a dark bark and tender collagen breakdown. The signature taste comes from bark texture plus a clean smoke profile.
When should I wrap my brisket?
Wrap when the internal temperature hits about 160–170°F and the bark looks set. Wrap too early and you can soften the crust; wrap too late and the stall can drag the finish out past your planned window.
How do I know when brisket is done?
Finish around 200–205°F in the thickest part, then verify with a probe. The meat should feel tender with minimal resistance. Temperature tells you where you are; tenderness confirms you’re there.
Why does brisket stall during the cook?
The stall often happens when evaporative cooling slows internal temperature rise. Moisture leaves the surface, absorbing energy in evaporation. When conditions change (especially after wrapping), temperature rise resumes.
How long should I rest Texas-style smoked brisket?
Rest at least 1 hour, and often 1–2 hours for easier slicing. Resting helps redistribute juices so slices stay moist and the bark doesn’t collapse from immediate cutting.
What wood ratio works best for classic Texas flavor?
A practical starting point is 70% oak and 30% hickory. Oak keeps smoke smooth and beef-forward; hickory adds depth. Adjust for your taste and your smoker’s airflow.
See also: Texas-style brisket