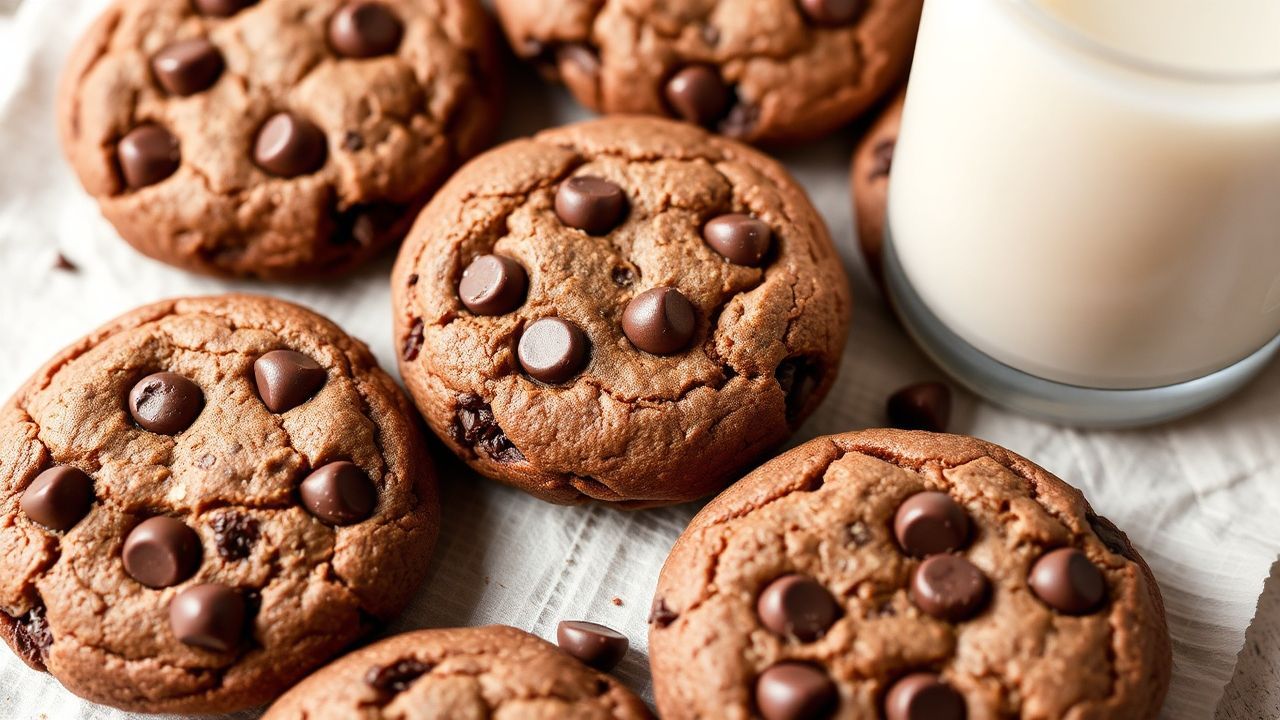
Small-batch chocolate chip cookies bring bakery-style comfort without baking dozens. You can mix, chill, and bake a tight batch fast—then enjoy fresh cookies while they’re at their best.
- Yield control: bake about 12 cookies instead of a huge batch.
- Chew on purpose: brown sugar + timed underbake + brief sheet cooling.
- Better texture: chill the dough to limit spread.
- Mix smarter: fold dry into wet until just combined.
In this guide, you’ll learn a reliable method for small-batch chocolate chip cookies—chewy centers, lightly crisp edges, and chocolate in every bite. You’ll also get practical timing targets, ingredient choices, and easy variations.
Choosing the Ideal Ingredients for Rich and Chewy Cookies
The base of great cookies starts with correct ingredient ratios and fresh pantry staples. Small-batch recipes make quality choices even more visible, so each item matters.
Start with unsalted butter. Use softened butter so it creams with sugar and traps air for a tender crumb. If you want a reliable explanation of butter’s role in baking, see butter.
For sugar, combine light brown sugar and granulated sugar. Brown sugar adds moisture and a caramel-like depth, while granulated sugar helps set the edges. Learn more about sugar chemistry at sugar.
Add a small amount of fine sea salt. Salt doesn’t make cookies salty; it sharpens sweetness and improves chocolate flavor. Many bakers pair salt with chocolate because flavor perception depends on salt presence.
Use all-purpose flour as your main structure. For extra chew, add a little bread flour to increase protein content and strengthen the dough network. For a background on flour types and protein, review flour.
For binding and emulsification, use room-temperature eggs. Cold eggs can slow mixing and lead to uneven dough. Vanilla rounds out the aroma and makes chocolate taste richer, even when the chocolate stays the star.
Finally, choose your chocolate. Use semi-sweet chips for classic flavor, or mix chips and chunks for both melt pockets and texture. To understand common chocolate styles, browse chocolate.
Mastering Dough Preparation for Consistent Results
Good small-batch cookies depend on technique, not luck. Small changes in mixing time and order affect spread, chew, and softness.
First, cream butter and sugars until the mixture looks light and slightly fluffy. Creaming for about 2–3 minutes is usually enough. Overmixing can build too much structure and cause cookies to bake thinner than you want.
Next, add the egg and vanilla. Mix just until smooth. Then keep your attention on dry ingredients: sift flour and combine it with baking soda and salt in a separate bowl.
Fold dry ingredients into wet using a spatula. Stop as soon as you don’t see dry flour. Overmixing increases gluten development, which can make cookies tough instead of chewy. For a science-backed overview of gluten, read gluten.
Now add chocolate. Fold in chips or chunks gently so they distribute evenly without breaking them. Even distribution matters because every cookie should deliver chocolate in the first bite.
Chill the dough at least 30 minutes. Chilling firms the butter, thickens the dough, and reduces spread. You’ll also gain a richer flavor as ingredients hydrate. This step is especially important in small batches because each cookie bakes quickly and spreads more uniformly.
Portion with a scoop so cookies bake at the same rate. Aim for about 12 cookies. Uniform size gives uniform doneness, which is key for a chewy center.
Tailoring Baking Techniques to Achieve the Perfect Texture
Baking time controls doneness more than almost anything else in a small batch. Because each cookie is smaller and more concentrated, you need tight timing targets.
Preheat the oven to 350°F (175°C). Use an oven thermometer if your oven runs hot or cool. When the oven holds steady heat, cookies bake evenly and brown properly. For general heat basics, see oven.
Line your baking sheet with parchment. Parchment prevents sticking and helps cookies release cleanly. It also supports even browning by buffering direct metal contact.
Watch the edges, not the center. Bake until the edges look set and lightly golden, while the middle still looks slightly underdone. For this recipe, that typically lands around 9–11 minutes.
Remove the pan from the oven at the right moment. If you bake to fully firm centers, you often lose the chewy interior. Residual heat keeps cooking the dough for a short window after baking.
Cool cookies on the sheet for 5–10 minutes, then move them to a rack. This short rest finishes the bake gently while preventing soggy bottoms. For a quick primer on why cooling matters, see baking.
If you want to fine-tune texture, adjust one variable at a time. Add 1 minute for a drier cookie, or pull them 30–45 seconds earlier for a softer center. Small batch recipes respond fast, so small changes create noticeable results.
Use these targeted tweaks:
- More cakey and tender: mix in an extra yolk to boost fat and moisture.
- Thinner and crisper: bake 1–2 minutes longer and watch for deeper browning.
This approach gives control. You’ll hit the chew you want without guesswork.
One practical way to stay consistent: rotate the pan halfway through baking. Hot spots vary between ovens and even between racks.
Creative Variations to Elevate Your Small-Batch Cookies
Once your base recipe works, you can customize flavors without risking texture. Changes should support the dough’s chew, not fight it.
For a nut-forward upgrade, fold in toasted pecans or walnuts. Toasting brings out aroma and reduces raw nut flavor. Aim for about 1/4 cup chopped nuts for a small batch.
Want deeper chocolate flavor? Swap half the chips for dark chocolate chunks. Chunks melt differently than chips, so you’ll get more gooey pockets.
For bright contrast, add orange zest. Zest lifts chocolate with citrus oils and makes the cookie feel more “dessert-like” even with simple ingredients.
To boost chocolate depth without strong coffee taste, use espresso powder. A small amount amplifies cocoa flavor because it changes how bitter notes read. For background on espresso and coffee flavor compounds, see espresso.
If you love caramel pockets, fold in chewy soft caramel bits. Keep the total add-ins modest so the cookie still bakes with a chewy center rather than spreading out from extra moisture.
For peanut butter marbling, add dollops of thick peanut butter. Swirl gently so you get ribbons, not full mixing. For more on peanut butter, review peanut butter.
Diet swaps can work too. You can use a 1:1 gluten-free flour blend if it contains a binder. You may need slightly more bake time because gluten-free dough can hold moisture differently. For gluten-free basics, see gluten-free diet.
You can also swap some sweetener choices. Coconut sugar adds caramel notes, but it behaves differently than white sugar. Make small adjustments and test once so your texture stays chewy.
Prep and Cook Time
Use this schedule when you want fresh cookies fast but still allow chilling time. Planning helps you avoid rushing the dough and skipping the texture step.
- Prep: 20 minutes (plus 30 minutes chilling)
- Bake: 9–11 minutes
- Total: About 1 hour
Yield
This recipe makes a tight batch you can finish while the cookies taste fresh. Expect small-to-medium cookies sized with a scoop.
- About 12 medium cookies
Difficulty Level
You can make these cookies with basic baking tools. The method stays straightforward even if you’re new to dough chilling.
- Easy to Medium
Ingredients
Keep ingredients at room temperature when the recipe calls for it. Room-temperature butter and egg mix more smoothly and help the dough hydrate evenly.
- 1/2 cup (113g) unsalted butter, softened
- 1/3 cup (70g) packed light brown sugar
- 1/4 cup (50g) granulated sugar
- 1 large egg, room temperature
- 1 teaspoon pure vanilla extract
- 1 cup (120g) all-purpose flour, sifted
- 2 tablespoons bread flour (optional, for chew)
- 1/2 teaspoon baking soda
- 1/2 teaspoon fine sea salt
- 3/4 cup (130g) semi-sweet chocolate chips or chunks
Instructions
Follow the sequence closely. It builds structure in the dough and keeps mixing time short.
- Preheat oven to 350°F (175°C) and line a baking sheet with parchment.
- Cream butter and sugars for 2–3 minutes until light and fluffy. Avoid overmixing.
- Add egg and vanilla. Mix until smooth.
- Combine dry ingredients: sift flour (and bread flour if using), then mix in baking soda and salt.
- Fold dry into wet with a spatula until no dry flour remains.
- Stir in chocolate gently until evenly distributed.
- Chill dough at least 30 minutes.
- Portion dough into about 12 mounds, spacing them about 2 inches apart.
- Bake 9–11 minutes. Edges should look set; centers should look slightly soft.
- Cool on the sheet for 5 minutes, then move to a rack.
Tips for Success
Small-batch cookies reward small adjustments. Use these tips to keep texture consistent cookie after cookie.
- Butter temperature matters: softened butter creams better than melted butter.
- Chill the dough: it limits spread and supports thicker, chewier cookies.
- Mix gently: stop mixing once dry flour disappears.
- Chocolate mix: half chips + half chunks often gives the best combo of melt and texture.
- Make ahead: refrigerate dough up to 24 hours, or freeze portions up to 1 month.
Serving Suggestions
Serve cookies when they’re warm and chocolate tastes most intense. A short rest on the rack keeps exteriors set while centers stay soft.
Pair small-batch chocolate chip cookies with cold milk or vanilla ice cream for a classic comfort combo. For a salty contrast, finish with a light sprinkle of flaky sea salt right after baking.
FAQ
If you want predictable results, check the answers below. These cover common issues like spread, chew level, and timing.
How do I keep small-batch chocolate chip cookies chewy?
Use brown sugar for moisture, bake until edges set but centers stay slightly soft, and cool on the sheet for 5–10 minutes. Also, avoid overmixing so the dough doesn’t turn tough.
Why did my cookies spread too much?
Most spread problems come from warm dough or over-creamed butter. Chill the dough at least 30 minutes and portion evenly with a scoop.
Can I freeze the dough for later?
Yes. Portion dough into balls, freeze on a tray, then store in a sealed bag. Bake from frozen with a couple extra minutes, watching the edges for doneness.
What chocolate type works best for this recipe?
Semi-sweet chips deliver classic flavor and reliable melting. For more texture, combine chips with chunks so you get both even distribution and dramatic pockets.
How do I store baked cookies so they stay soft?
Cool completely, then store in an airtight container. Keep them at room temperature for up to 3 days for best texture, or freeze for longer storage.
See also: small-batch chocolate chip cookies