
There’s something downright magical about biting into a pizza with a crust that strikes the perfect balance-crispy on the outside, airy and tender on the inside, and bursting with just the right amount of flavor.Whether you’re a seasoned home cook or a Perfect Pizza novice, mastering the art of the perfect pizza crust can transform your homemade pie from ordinary to extraordinary. In this easy recipe guide, we’ll unravel the secrets behind that coveted golden Perfect Pizza crust, breaking down essential techniques and ingredients so you can create mouthwatering pizzas that rival your favorite pizzeria. Get ready to roll up your sleeves and embark on a delicious journey toward pizza perfection!
Choosing the ideal Flour for a Crispy and Chewy Texture
Master the Art of Perfect Pizza Crust by understanding the crucial role of flour selection in achieving that coveted balance between crispy exterior and delightfully chewy bite. The type of flour you choose sets the foundation for flavor, texture, and structure in your dough.
For a pizza crust with the perfect combination of crispiness and chewiness, opt for high-protein flours such as bread flour or Italian Tipo 00 flour. Bread flour’s higher gluten content (around 12-14%) forms a strong network of elastic strands that trap gas bubbles during fermentation, resulting in a beautifully airy crumb while maintaining chew. Tipo 00 flour, finely milled and softer, yields an ultra-silky dough that crisps nicely without toughness.
Avoid all-purpose flour if you want to take your crust to the next level-it works in a pinch but delivers a less resilient texture. For an artisanal approach, a blend of bread flour and 00 flour (about 50:50) can harmonize chew and lightness.
Secrets to achieving the Perfect Dough Consistency Every Time
Nailing the dough consistency is like striking a delicious balance between wet and firm.When mixing your dough, start by adding water gradually-ideally, lukewarm-to allow the flour to hydrate fully without becoming sticky or slack.Your ideal dough should feel supple and slightly tacky but never sticky enough to cling excessively to your fingers.
One foolproof method is the “windowpane test”: stretch a small ball of dough gently between your fingers until it becomes translucent. If it tears instantly, it needs more kneading or hydration. If it tears too easily, reduce water slightly next time.
Always rest your dough for at least 5 to 10 minutes halfway through kneading to let the gluten relax. This restores elasticity and prevents overworking. Using a stand mixer with a dough hook can simplify this process, but hand kneading offers better control over this tactile stage.
Mastering the Art of Proper Dough Rising and Proofing
once you’ve achieved perfect dough consistency, proving it patiently elevates flavor and texture to sublime levels. The magic lies in allowing yeast to ferment slowly, creating carbon dioxide pockets that expand the dough and deepen complexity.
For best results, proof your dough in a warm, draft-free environment-ideally between 75°F and 80°F-covered with a damp cloth or plastic wrap to retain moisture. A slow, cold fermentation in the fridge over 24 to 72 hours develops unparalleled flavor; bring the dough back to room temperature about 2 hours before shaping.
During your dough’s first rise, gently pressing two fingers into the surface is a key test: if the indentation stays and slowly fills back in, the dough has “proofed” perfectly and is ready to be shaped.
Baking Techniques That Guarantee a Golden, Crispy Crust
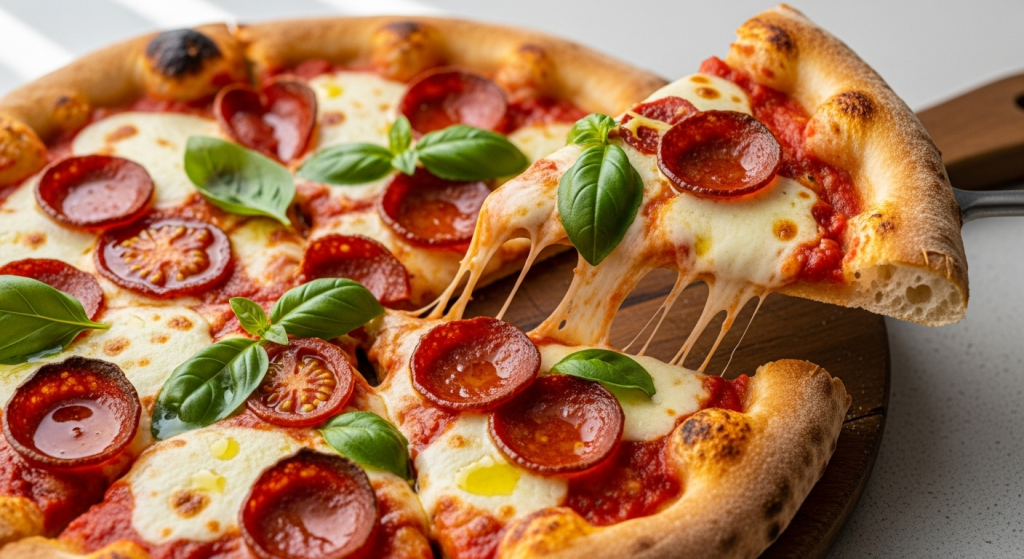
every bite of your pizza crust should be an irresistible harmony of golden crispness and tender chew.Achieving this begins with a blistering hot oven-aim for at least 500°F (260°C) or higher. If you have a pizza stone or steel, preheat it for a minimum of 45 minutes so it radiates even heat directly into your dough.
When your pizza hits the oven,that rapid burst of heat creates steam inside the dough,puffing it up and forming tiny air pockets that produce a light crumb. Concurrently, the intense heat crisps the exterior crust in minutes, locking in moisture while producing a golden hue with slight charred spots reminiscent of authentic wood-fired pizza.
For an extra layer of crunch, brush the dough’s edge lightly with olive oil before baking. Avoid overloading toppings, as excess moisture can weigh down the dough and hinder crisping.

prep and Cook Time
- Preparation: 20 minutes
- First rise: 1 to 2 hours (or up to 72 hours for cold fermentation)
- Proofing: 1 hour
- Baking: 8-12 minutes
Yield
Serves 2 large 12-inch pizzas or 4 personal-sized pizzas.
Difficulty Level
Medium - perfect for home cooks ready to refine their skills and impress guests.
Ingredients
- 3 ½ cups bread flour (or 50% bread flour, 50% Tipo 00 flour), sifted
- 1 ¼ cups lukewarm water (about 100°F/38°C)
- 2 teaspoons active dry yeast
- 2 teaspoons fine sea salt
- 1 tablespoon olive oil (plus extra for brushing)
- 1 teaspoon sugar (optional, aids yeast activation)
Instructions
- Activate the yeast: In a small bowl, combine lukewarm water, sugar, and active dry yeast. Stir gently and let sit for 5-10 minutes until foamy.
- Mix dry ingredients: In a large mixing bowl or stand mixer, whisk together bread flour and sea salt.
- Combine wet and dry: Pour the activated yeast mixture and olive oil into the flour. stir with a wooden spoon or dough hook until a shaggy dough forms.
- Knead the dough: Transfer dough to a lightly floured surface and knead for about 8-10 minutes until smooth, elastic, and slightly tacky. Or knead in a stand mixer at medium speed for 7-8 minutes. Rest the dough 5-10 minutes halfway through to allow gluten relaxation.
- First rise: Shape dough into a ball and place in an oiled bowl, turning once to coat.Cover with plastic wrap or a damp towel. Let rise in a warm place for 1-2 hours until doubled in size. For deeper flavor, refrigerate for 24-72 hours for cold fermentation, then bring to room temperature before shaping.
- Shape the dough: Gently punch down the dough to release excess gas. Divide into portions. Stretch each ball on a lightly floured surface or toss in the air to form your desired pizza shape, leaving a thicker rim for the crust.
- Proof the shaped dough: Place shaped dough on parchment paper or a pizza peel dusted with semolina. Cover loosely and let proof for 45-60 minutes until puffy.
- preheat the oven: Place your pizza stone or steel in the oven and preheat to 500°F (260°C) or higher for at least 45 minutes.
- Top and bake: Add your favorite pizza toppings without overloading. Brush the crust edges lightly with olive oil. Slide pizza onto the hot stone and bake for 8-12 minutes, until golden and crisp with slight charring.
- Serve immediately: Remove pizza from oven, garnish with fresh basil or chili flakes, slice, and enjoy the perfect balance of crisp and chewy texture.
Tips for Success
- Flour choice matters: Experiment with blends of bread flour and Tipo 00 for refined texture.
- Hydration balance: If dough feels sticky, add flour in teaspoons rather than large amounts to avoid dryness.
- Proofing environment: Use your oven with the light on or near a warm spot to maintain ideal temperatures for rising.
- Cold fermentation tip: Longer cold fermentation enhances flavor-plan ahead for best results.
- Use a Perfect Pizza stone or steel: They retain heat far better than baking sheets for superior crust crispness.
- Don’t overload toppings: excess moisture weights down dough and reduces crispiness.
Serving Suggestions
Present your pizza on a rustic wooden board or luminous ceramic plate to highlight the golden crust’s artisanal charm. Garnish with freshly torn basil, a drizzle of high-quality extra virgin olive oil, or a sprinkle of flaky sea salt.Pair with a crisp green salad or a glass of chilled Italian red wine like Chianti to complement the herbaceous, toasty flavors of the crust.
| Nutrient | Per Serving (1/2 pizza) |
|---|---|
| Calories | 320 kcal |
| Protein | 9 g |
| Carbohydrates | 58 g |
| Fat | 4 g |
For more tips on dough fermenting, check out our complete guide to pizza dough fermentation or explore the science behind gluten growth on Coursera’s baking science course.
Q&A
Q&A: Master the Art of Perfect Pizza Crust – Easy Recipe Guide
Q1: What’s the secret to achieving a perfect pizza crust?
A: The secret lies in balancing flour quality, hydration, fermentation time, and baking technique.Using high-protein flour, just the right amount of water, allowing your dough to ferment slowly, and baking at a high temperature all contribute to that ideal crust-crispy on the outside, chewy and airy inside.
Q2: Can I use all-purpose flour, or do I need specialty flours?
A: While all-purpose flour works in a pinch, high-protein bread flour or Italian “00” flour are your best friends for classic pizza crust. They provide more gluten, resulting in better chew and structure. If you want to experiment, a mix of all-purpose and bread flour can also yield great results.
Q3: How vital is kneading, and can I skip it?
A: Kneading develops the gluten network, giving your dough elasticity and strength. Light kneading is essential, but over-kneading can make the crust tough. If time is tight, you can use a no-knead method-just let a higher hydration dough ferment longer for natural gluten development.
Q4: What’s the role of fermentation in Perfect Pizza dough?
A: Fermentation allows yeast to work its magic, producing flavor and texture. Slow fermentation in the fridge for 24-72 hours develops depth and complexity, making your crust tastier and more digestible.Patience truly rewards you with a crust that’s both flavorful and airy.
Q5: How high should I bake my Perfect Pizza, and for how long?
A: A blistering hot oven-ideally 475°F (246°C) or higher-is key to Perfect Pizza crust. Bake for 8-12 minutes, keeping an eye on it. The intense heat creates that lovely char and blistering, mimicking a customary wood-fired oven’s effects right at home.
Q6: Is it better to stretch the dough by hand or use a rolling pin?
A: hand-stretching is preferable for a light, airy crust as it preserves the air bubbles that develop during fermentation. Rolling pins can flatten the dough too much and push out those precious bubbles, leading to a denser crust.
Q7: How can I make my crust extra flavorful without adding toppings?
A: Incorporate ingredients like garlic powder, fresh herbs, or Parmesan into your dough or brush the crust with olive oil infused with herbs before baking. these subtle touches elevate the flavor profile without overpowering your toppings.Q8: Can I freeze Perfect Pizza dough without losing quality?
A: Absolutely! Freeze your dough balls before the final rise in airtight containers. When ready to use, thaw slowly in the fridge overnight. This helps retain texture and flavor, offering convenience without compromise.
Q9: What common mistakes should I avoid when making pizza crust?
A: Avoid rushing fermentation, skimping on salt (which enhances flavor), using too little oven heat, and overloading your Perfect Pizza with toppings. each mistake can affect your crust’s texture, flavor, or cooking time.
Q10: Any last pro-tip for Perfect Pizza crust mastery?
A: Treat your dough like a living being-handle it gently, give it time, and bake it hot. experiment with hydration and fermentation until you find your perfect balance.Remember, Perfect Pizza is both art and science: practice, patience, and passion make Perfect Pizza!
Concluding Remarks
With your newfound knowledge and this easy recipe guide in hand, mastering the art of the perfect pizza crust is well within your reach. From the subtle dance of yeast activation to the delicate balance of flour and water, each step brings you closer to that ideal combination of crispy edge and tender crumb. So next time you roll out your dough, remember: great Perfect Pizza starts from the ground up-with a crust crafted by your own hands. Embrace the process, experiment boldly, and most importantly, savor every delicious bite of your homemade masterpiece. Your perfect pizza journey begins now!