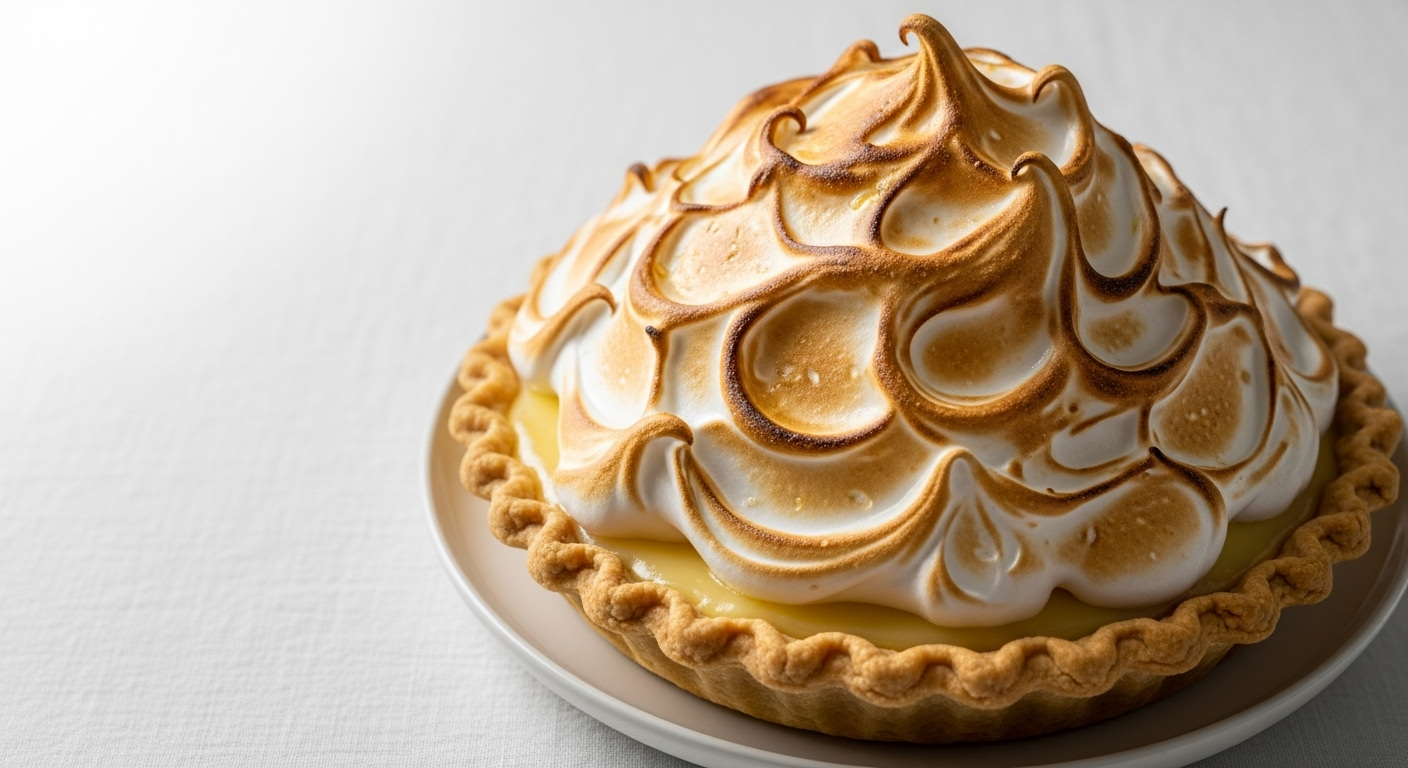
Classic lemon meringue pie lives or dies by one thing: the balance between a set, glossy lemon curd and a foam that can actually hold height. A true mile-high meringue isn’t a styling trick. It’s a controlled result of curd thickness, egg-white stability, and bake timing.
- What “Mile-High” Really Means in Lemon Meringue Pie
- Classic Lemon Curd: Set the Base for a Tall Meringue
- Crust That Stays Crisp Under Meringue
- Mile-High Meringue: Whip, Stabilize, Seal
- Step-by-Step Recipe: Mile-High Classic Lemon Meringue Pie
- Ingredients
- Prep timeline
- 1) Make and blind-bake the crust
- 2) Cook the lemon curd until it truly thickens
- 3) Fill and chill for firmness
- 4) Whip the meringue to stiff, glossy peaks
- 5) Top, seal, and shape
- 6) Bake to toast and dry the foam
- Texture Checklist: How to Know You Did It Right
- Common Failure Points (and the Fix)
- Grainy or lumpy lemon filling
- Weeping (liquid pooling under meringue)
- Shrinking from the crust
- Meringue that collapses after cooling
- Too-browned but still soft top
- Serving and Storage for Best Slices
- Optional Upgrades Without Changing the Core Technique
- FAQ
This recipe gives you a crisp, buttery crust, a bright cooked lemon curd, and a tall meringue that toasts without collapsing. You’ll learn the exact texture targets so your filling sets cleanly and your peaks stay proud long enough to slice beautifully.
- Cook the curd to a real boil so starch thickening sets firmly under the meringue.
- Whip stiff, glossy peaks for stable air bubbles that support “tall” structure.
- Seal the meringue to the crust to reduce weeping and shrinking gaps.
- Dry and brown, don’t overbake—timing controls height and slice texture.
What “Mile-High” Really Means in Lemon Meringue Pie
When people say “mile-high,” they’re describing a meringue that rises in a thick dome and keeps its shape after cooling. That means the foam must trap air effectively and then set on the surface during baking.
The goal isn’t just a tall look. You also want a clean slice line: the lemon layer stays firm, and the meringue holds a crisp crust without turning rubbery.
The three variables that control height
First is curd thickness. If your lemon curd stays too loose, the meringue can sink and thin out. Second is meringue stiffness. If whites don’t whip to the right stage, the structure collapses. Third is bake time and temperature. Too little heat keeps it soft; too much heat can brown before it fully dries.
These mechanics tie directly to how egg foam works. For background on egg proteins and foam behavior, review food foam.
Classic Lemon Curd: Set the Base for a Tall Meringue
A lemon meringue pie is only as stable as the curd. You’re making a cooked custard with lemon juice, sugar, and starch (cornstarch) that thickens as it heats and then stays set as it cools.
If you’ve ever had a gummy bottom or a meringue that weeps, the root cause is usually curd temperature and thickness—not your meringue alone. The curd must be fully cooked and cool before you top it.
Cook targets (no guesswork)
Starch-based curd needs consistent heating. Whisk until the mixture thickens and reaches a full boil, then stir for about 30–60 seconds more. That short “finish boil” helps starch granules fully hydrate and thicken throughout.
For the science of starch thickening, see starch. Then use the practical test: your curd should coat a spoon and look glossy, not runny.
Temper the yolks for smoothness
Egg yolks add richness and a silky texture, but adding them too fast can cause scrambling. Tempering solves this: pour a small amount of hot curd into the yolks while whisking, then return everything to the pan.
Once you reheat, stir steadily until the mixture thickens again. That second thickening stage is where you lock in custard body.
Crust That Stays Crisp Under Meringue
Classic crust for lemon meringue pie is typically a short, buttery dough. The problem: meringue bakes with steam and sugar, and steam can soften crust if you skip par-baking.
That’s why you should bake the crust with weights and then bake a final few minutes until it turns golden. This “dry base” helps the crust resist moisture from below.
Blind bake essentials
Use pie weights or dried beans and bake until the dough sets. After removing weights, bake again until the bottom looks dry and lightly browned. Let the crust cool fully before filling.
If you want a deeper look at how baked dough sets, baking structure, and moisture loss, search pie crust.
Mile-High Meringue: Whip, Stabilize, Seal
The “height” comes from trapped air inside whipped egg whites. Sugar dissolves in the foam and helps stabilize that structure, which slows collapse and keeps the meringue glossy longer during baking.
To keep it practical: you’re aiming for stiff, glossy peaks. When you lift the beaters, the peak should stand upright with a smooth tip, not curl over.
Whipping method for stable peaks
Start with room-temperature egg whites. Cold whites whip but often take longer and may not reach the same texture reliably. Add cream of tartar early to help the foam hold.
Then add sugar gradually. Sprinkling sugar in slowly gives it time to dissolve instead of staying gritty. If you use regular granulated sugar, you can still succeed, but you must beat longer until it feels less grainy when rubbed between fingers.
Why sealing matters (and how to do it)
After you spoon or pipe meringue, push it gently to the crust edge all around. This creates a barrier so steam doesn’t slide down and collect as liquid at the boundary.
In many “weeping” cases, the filling and meringue separate because gaps form at the rim. Sealing prevents that weak point.
For a broader chemistry view of egg foam stability and protein behavior, check egg.
Step-by-Step Recipe: Mile-High Classic Lemon Meringue Pie
This recipe makes one 9-inch (23 cm) pie, with enough lemon filling to stay set and enough meringue to create a thick, toasted top.
Read through once before starting. The flow matters: the curd must cool before topping, and the crust must cool before filling. Rushing any cooling step often causes gaps or sinking.
Ingredients
For the crust
- 1 1/4 cups all-purpose flour, sifted
- 1/2 cup unsalted butter, chilled and cubed
- 2 tbsp granulated sugar
- 1/4 tsp salt
- 3–4 tbsp ice water (add slowly)
For the lemon curd
- 1 cup granulated sugar
- 1/4 cup cornstarch
- 1/4 tsp salt
- 1 1/2 cups water
- 3 large egg yolks, lightly beaten
- 1/3 cup fresh lemon juice (about 2–3 lemons)
- 2 tbsp unsalted butter
- Zest of 2 medium lemons
For the mile-high meringue
- 4 large egg whites, room temperature
- 1/2 tsp cream of tartar
- 3/4 cup granulated sugar (superfine preferred)
- 1 tsp pure vanilla extract
Prep timeline
Plan about 3 hours total, including cooling. If you want the cleanest slice, refrigerate the filled crust and cooled curd until firm.
Preparation: ~25 minutes. Cooking: ~30 minutes. Cooling: ~2 hours (plus final bake and cooling).
1) Make and blind-bake the crust
Mix flour, sugar, and salt in a bowl. Cut in chilled butter until the mixture looks like coarse crumbs. Add ice water a tablespoon at a time until the dough just comes together.
Shape into a disc, wrap, and refrigerate at least 30 minutes. Roll to a 12-inch circle and fit into a 9-inch pie dish. Prick the bottom lightly with a fork.
Line with parchment and add weights. Bake at 375°F (190°C) for 15 minutes. Remove weights and parchment, then bake 8–10 minutes more until golden.
Cool completely on a rack.
2) Cook the lemon curd until it truly thickens
In a saucepan, whisk sugar, cornstarch, and salt. Whisk in water until smooth.
Cook over medium heat, stirring constantly, until thickened and bubbling. It should reach a full boil—then keep stirring for 30–60 seconds so the starch sets.
Turn off the heat. Slowly whisk about 1/2 cup of the hot mixture into the beaten yolks to temper. Pour the yolk mixture back into the pan while whisking.
Cook 2 more minutes until thickened again. Remove from heat and stir in lemon juice, butter, and zest until smooth and glossy.
3) Fill and chill for firmness
Pour curd into the cooled crust. Press plastic wrap directly onto the surface to prevent a skin. Refrigerate until firm, about 1 hour.
This firm chill supports the meringue during baking. It also improves separation quality when you cut the first slice.
4) Whip the meringue to stiff, glossy peaks
Use clean beaters and a clean bowl—any grease weakens foam. Add egg whites and cream of tartar. Beat on medium until soft peaks form.
Add sugar gradually, 1 tablespoon at a time. After all sugar goes in, raise speed to high and beat until stiff, glossy peaks form. Beat in vanilla.
Quick texture check: stiff peaks should stand upright and not slide. If they droop, keep whipping for another 30–60 seconds.
5) Top, seal, and shape
Spoon or pipe meringue onto the chilled curd. Start at the center and spread outward. Build up height by using thicker meringue in the middle.
Seal the edges by pressing meringue to the crust around the entire rim. Smooth the top for an even dome.
6) Bake to toast and dry the foam
Bake at 350°F (175°C) for 10–12 minutes, until the top turns golden and the edges look crisp.
Watch closely in the final minutes. You want dry peaks, not a dark shell that turns brittle.
Cool on a wire rack at least 1 hour before slicing. If you slice too early, the curd can still be soft and the meringue can feel sticky.
Texture Checklist: How to Know You Did It Right
Great lemon meringue pie should show contrast: smooth, set curd beneath a light, toasted foam top. Use these targets to troubleshoot without stress.
Texture is your map. If your measurements look right but your pie fails, the textures usually reveal why.
Curd checklist
- Before chilling: gloss + bubbles at a rolling boil during cooking.
- After chilling: slices cleanly or holds shape when you tilt the pie.
- On spoon test: coats the back of a spoon and doesn’t run like syrup.
Meringue checklist
- Peak stage: stiff, glossy peaks that stand straight.
- After baking: golden tips with dry-looking surfaces.
- After cooling: holds dome shape and doesn’t collapse into a puddle.
Common Failure Points (and the Fix)
Most lemon meringue problems come from predictable causes. Once you learn these, each attempt gets easier.
Below are the most common issues and exactly what to adjust next time.
Grainy or lumpy lemon filling
This usually means the custard didn’t cook evenly or the yolks were added too quickly. Temper slowly and whisk constantly when you return yolks to the pan.
Also ensure you reach a full boil during the first cook. Undercooked starch can thicken unevenly.
Weeping (liquid pooling under meringue)
Weeping typically comes from steam escaping through gaps at the rim or from a meringue that baked too softly. Seal the edges firmly with meringue before baking.
For the bake, aim for golden crisp edges. If the top looks pale or soft, add 1–2 minutes next time.
Shrinking from the crust
Shrinking happens when the meringue doesn’t adhere during bake or when the filling is warm. Press meringue to the crust and use a fully chilled curd.
If you still see gaps after cooling, reduce meringue spreading thinly—keep thicker coverage near the rim.
Meringue that collapses after cooling
Collapse usually comes from under-whipping (peaks not stiff enough) or waiting too long after whipping. Whip to stiff, glossy peaks, then top and bake promptly.
Remember: the air structure in foam can fade if you delay. Work fast once your meringue hits the right stage.
Too-browned but still soft top
If your meringue browns fast but feels soft, the bake needs more time in a controlled way, or your oven runs hot. Confirm oven temperature with a thermometer if you have one.
Start with the stated times, then adjust by 1–2 minutes based on your oven’s behavior.
Serving and Storage for Best Slices
Serve lemon meringue pie after it cools fully. The curd needs that time to set, and the meringue needs time to firm and toast.
For clean cutting, use a sharp serrated knife. Dip in hot water, wipe between slices, and cut with steady pressure.
How long it stays at its best
Expect the crispness to fade as humidity rises. For peak texture, serve within the first few hours after baking and cooling.
For storage, refrigerate if you must. Just note that refrigeration can soften the meringue over time.
Storage tips that reduce weeping
- Cover loosely. Avoid trapping extra moisture against the meringue.
- Use within 24 hours for the best “crack” on top.
- Bring to cool room temperature before serving for better curd set and smoother texture.
Optional Upgrades Without Changing the Core Technique
You can customize flavor while keeping the mile-high method intact. The key is to preserve the curd’s set and the meringue’s stability.
Small swaps are fine; big changes to liquid ratios are not.
Lemon-forward intensity
Use zest generously and juice fresh. Zest adds aroma, while juice provides bright acidity.
If you want a refresher on lemon flavor components and culinary uses, see lemon.
Make it lime-mousse adjacent (lime variation)
You can swap lemon juice and zest for lime for a different citrus profile. Keep the same method and proportions so starch thickening and curd set stay reliable.
Color and presentation
If your meringue browns unevenly, rotate the pie during the last few minutes. Keep an eye on the dome so it toasts, not burns.
Alternatively, you can broil briefly after baking, but watch constantly because broilers go from golden to scorched fast.
FAQ
Why did my lemon filling turn grainy?
Most graininess comes from undercooked starch or eggs not tempered smoothly. Cook the curd until it reaches a full boil, then boil briefly while stirring. Temper yolks slowly and whisk constantly when reheating.
Why does my meringue weep or pull away from the crust?
Gaps at the rim let steam escape, and warm filling can also melt foam. Seal the meringue to the crust all the way around, and chill the curd until firm before topping.
How do I get stiff, glossy peaks every time?
Use room-temperature whites, beat with cream of tartar, and add sugar gradually. Stop only when peaks look glossy and stand straight. If sugar feels gritty, beat longer until it dissolves.
What’s the best bake time for maximum height?
Use the provided 10–12 minutes at 350°F (175°C) as your baseline, then adjust by 1–2 minutes based on your oven. You want golden, dry edges—not a soft dome.
Can I make parts ahead of time?
Yes. Bake the crust and cook the lemon curd ahead, then refrigerate both until ready. Assemble and bake the meringue closer to serving so the topping stays tall and crisp.
If you want broader context on the classic dessert, you can review lemon meringue pie.
See also: Mile-High Lemon