
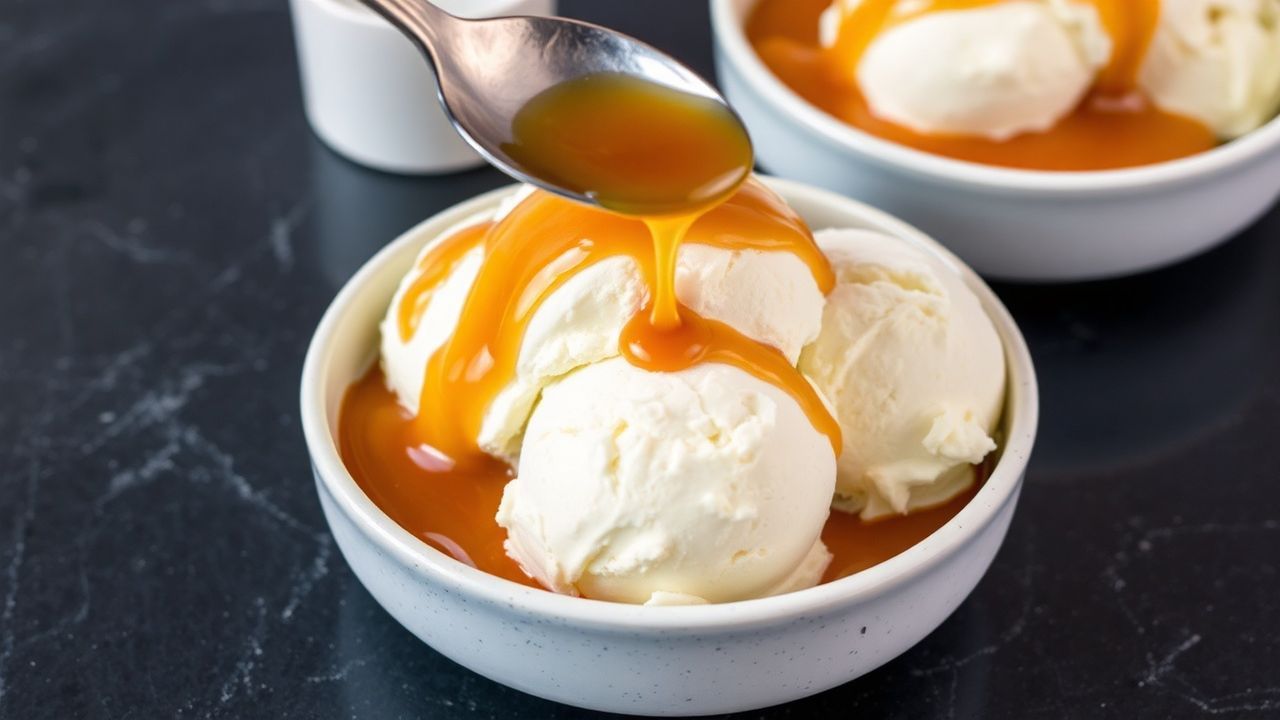
Salted caramel sauce turns plain scoops into a dessert you want to savor. Its sweet, buttery base and tiny sea-salt finish create a balanced flavor that tastes rich, not cloying.
At a Glance
- Focus keyword: Irresistible salted caramel sauce makes the best ice cream topping.
- Texture control: Warm cream + steady heat helps you avoid grainy caramel.
- Flavor lift: Flaky salt adds contrast and depth without overpowering.
- Make ahead: Store chilled, then rewarm for a glossy pour.
This is the sauce where heat, timing, and small details matter. You’ll learn how to cook sugar to the right amber color, whisk in butter, then add warm cream for a smooth result.
In the sections below, you’ll find a clear ingredient guide, a reliable method, and easy serving ideas. You’ll also get troubleshooting tips so your salted caramel sauce stays silky every time.
Choosing the Best Ingredients for Richness and Depth of Flavor
Start with ingredients that support caramel’s main job: turning simple sugar into deep, toasty flavor. Granulated sugar gives predictable caramelization, while unsalted butter improves texture and roundness.
Then choose dairy that melts smoothly. Heavy cream creates a satin body that clings to ice cream, and pure vanilla extract adds warmth without masking caramel’s flavor.
For salt, keep it purposeful. Flaky sea salt tastes clean and pops against sweetness, which is why it works so well in salted caramel recipes. If you want to understand the science of flavor contrasts, see salt.
If you want a quick ingredient philosophy, think in layers: caramel for sweetness and color, butter for richness, cream for silkiness, and salt for contrast. That structure helps you control the final taste profile. For background on how heat changes food, read Maillard reaction and how browning builds complexity.
Prep and Cook Time
Prep Time: 5 minutes.
Cook Time: 15 minutes. Total: about 20 minutes.
Yield
This recipe makes about 1½ cups of salted caramel sauce. It’s enough to drizzle over 6–8 servings of ice cream, depending on how generous you are.
If you’re planning a dessert night, this yield works well for multiple toppings. You can also scale it up without changing technique—just keep your heat steady.
Difficulty Level
Easy to medium. You don’t need special tools, but you do need attention during sugar melting.
When sugar hits the right stage, it moves fast. That’s why this recipe focuses on simple, repeatable steps rather than guessing.
Ingredients
- 1 cup granulated sugar
- 6 tbsp unsalted butter, cut into cubes
- 1/2 cup heavy cream, warmed
- 1 tsp pure vanilla extract
- 1 tsp flaky sea salt (adjust to taste)
Step-by-Step Techniques to Achieve the Perfect Silky Texture
Good caramel comes from controlled heat. You’ll melt sugar evenly, then whisk in butter and warm cream to lock in a smooth texture.
Use a heavy-bottomed pan for even heating. That choice reduces hot spots that can burn sugar and create bitter notes, which you’ll never fully hide in the final dessert.
- Warm your heavy cream: Gently heat the cream in a small saucepan or microwave until warm, not boiling. Warm cream prevents the caramel from seizing.
- Melt the sugar evenly: Add granulated sugar to a heavy-bottomed saucepan over medium heat. Let it dissolve for about 3 minutes without stirring, then gently swirl the pan to spread melting.
- Cook to deep amber: Continue cooking until the syrup turns deep amber. Watch closely; caramel browns quickly once it starts.
- Add butter with care: Remove the pan from heat, then whisk in the butter cubes. The mixture will bubble vigorously—this is normal—and it should become glossy as butter blends in.
- Incorporate warm cream slowly: Pour the warm cream in a steady stream while whisking. Stir until smooth and uniform; this step creates the classic silky caramel body.
- Finish with vanilla and salt: Stir in vanilla and flaky sea salt. Taste and adjust salt only after the sauce smooths out.
- Cool and store: Let the sauce cool slightly before transferring to a heatproof jar. It thickens as it cools, but it will stay pourable if you rewarm it later.
If you want a deeper science view of caramel formation, caramelization explains why sugar turns into complex flavors. It also clarifies why uneven heat and burning ruin the outcome.
For a practical texture check, look for a sauce that flows like warm honey. If it looks grainy, it’s usually a temperature or sugar-dissolution issue, not a lost cause.
Tips for Success: Chef’s Notes
- Use a heavy-bottomed saucepan to prevent uneven heating and hot spots.
- If sugar starts to crystallize, avoid aggressive stirring. Instead, swirl gently until the sugar remelts.
- Adjust flaky sea salt to taste. Start with less if you’re sensitive to salt.
- Store leftovers in an airtight jar in the fridge for up to two weeks. Rewarm gently before serving.
- If you want a different flavor direction, add a small pinch of cinnamon when finishing. It pairs well with vanilla and caramel.
Also keep a close eye on the color stage. Caramel can go from “perfect amber” to “burnt” in a short window, and burnt sugar creates bitterness that salt can’t fully fix.
For handling hot liquids safely, use oven mitts and keep your face back from the pan. This reduces the risk of burns during the whisk-and-pour steps.
Creative Serving Suggestions to Elevate your Ice Cream Experience
Salted caramel sauce shines because it brings contrast to cold, creamy textures. Drizzle it over vanilla, butter pecan, or chocolate ice cream for an immediate flavor upgrade.
For a more premium look, pour in wide ribbons so each scoop gets both sauce and sauce-free “clean” bites. Then add a small topping like toasted nuts to bring crunch.
Try pairing salted caramel sauce with banana and dark chocolate. Warm the sauce for 10–20 seconds and drizzle over sliced bananas, then finish with chopped chocolate for sweet-salty depth.
You can also use it beyond classic scoops. For example, spread a thin layer on pancakes or swirl it into coffee for a salted caramel latte style. If you want to explore the role of sugar in dessert texture, see sugar and how it behaves during heating.
Pairing Ideas
- Vanilla ice cream + salted caramel + toasted pecans
- Chocolate ice cream + salted caramel + flaky sea salt
- Cinnamon ice cream + warm caramel + roasted pears
- Homemade ice cream sandwiches + salted caramel drizzle
For special occasions, you can layer salted caramel sauce between brownie pieces. The sauce softens edges and adds a rich, chewy contrast when served shortly after assembly.
As a finishing touch, add mint leaves or a small dusting of cocoa. Keep garnishes light so caramel stays the star.
Q&A
Below are the most common questions home cooks ask when making salted caramel sauce for ice cream. Use these answers to troubleshoot quickly and improve results.
If you’re still unsure, focus on the two keys: warm cream and controlled caramel color. Those steps handle most issues before they start.
What makes salted caramel sauce the ultimate ice cream topping?
It balances sweetness with a small amount of sea salt. That contrast makes the caramel taste richer and helps ice cream flavors stand out instead of tasting flat.
How do you achieve the perfect texture for salted caramel sauce?
Use a heavy-bottomed pan, cook to deep amber, then whisk in off-heat butter and warm cream. Stir until smooth, then cool and rewarm gently for serving.
Can I make salted caramel sauce ahead of time?
Yes. Store it in an airtight jar in the fridge for up to two weeks. Rewarm slowly so it returns to a glossy, pourable consistency.
Why does my caramel turn grainy or separate?
Graininess usually comes from sugar crystallizing or from adding cream that isn’t warm enough. Keep heat steady, swirl gently during melting, and add warm cream slowly while whisking.
What’s the best salt for salted caramel sauce?
Flaky sea salt works best because it dissolves slowly and gives bursts of flavor. If you want to understand salt’s flavor impact, review salt on Wikipedia.
See also: salted caramel