There’s something undeniably captivating about the tangy crunch of giardiniera-a vibrant mosaic of pickled vegetables that dances on the palate with every bite. This Italian-inspired condiment, bursting with crispness and zesty notes, has long been a staple on sandwiches, antipasti platters, and beyond. But why confine this flavorful symphony to store-bought jars when you can create your own homemade giardiniera? In this article, we’ll dive into the art of crafting perfect giardiniera pickles at home, unlocking the secrets to balancing acidity, spice, and texture. Prepare to awaken your senses and elevate your culinary repertoire with a jarful of crisp,zesty goodness.
Choosing the Perfect Vegetables for Vibrant Giardiniera
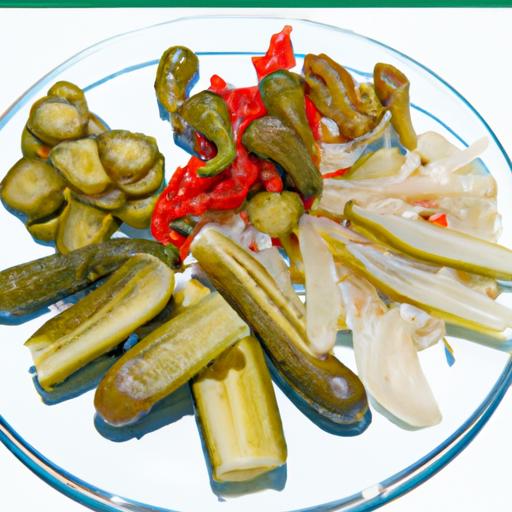
Crisp & Zesty Homemade Giardiniera pickles begin with selecting the freshest, most colorful vegetables you can find. The secret to that unmistakable crunch and vibrant appearance lies in choosing a combination that balances texture and flavor beautifully. Classic choices like crisp celery and fiery bell peppers in red,green,and yellow varieties bring a spectrum of color and sweet earthiness. Add carrots for subtle sweetness and a vivid orange hue, while cauliflower florets provide a pleasant bite and a neutral base to showcase the spices.
When choosing your vegetables, look for firm, blemish-free produce without any soft spots or discolorations-this guarantees the final product is visually stunning and texturally inviting. Consider peeling the carrots and cutting everything into uniform bite-sized pieces so they ferment evenly and create a consistent mouthfeel.
Mastering the Brine Balance for the Ultimate Crispness
The crisp texture that defines perfect giardiniera pickles is achieved by mastering the right brine balance. The magic lies in the ratio of vinegar, water, and salt – each playing a crucial role.
Start with a brine comprising distilled white vinegar and filtered water, typically a 1:1 ratio, combined with kosher salt.The vinegar lends that signature tangy zest while the salt controls fermentation, draws out moisture from the vegetables, and preserves their crunch.
Too much vinegar can overpower the delicate vegetable flavors; too little leaves them mushy and prone to spoilage. The medium salt content ensures the vegetables remain firm but also encourages just enough fermentation for that subtle tang without becoming sour. Using non-iodized salt like kosher or sea salt also helps to avoid off-flavors.
Infusing Flavor with Spices and Herbs for a Zesty kick
nothing elevates giardiniera like aromatic spices and fresh herbs. Cracked black peppercorns add mild heat and depth,while mustard seeds introduce a gentle pungency that wakes up the palate. Classic red chili flakes or calabrian chilies bring vibrant heat, perfect for those craving a punch of spice.
Fresh herbs such as oregano and bay leaves introduce earthy undertones, while minced garlic cloves add savory warmth. Layer these flavors within the jar, alternating vegetables and spices to ensure every crunch explodes with zest. This blend creates a complex,multi-dimensional profile that lingers delightfully with every bite.
Tips for Proper Fermentation and Storage to Maximize Freshness
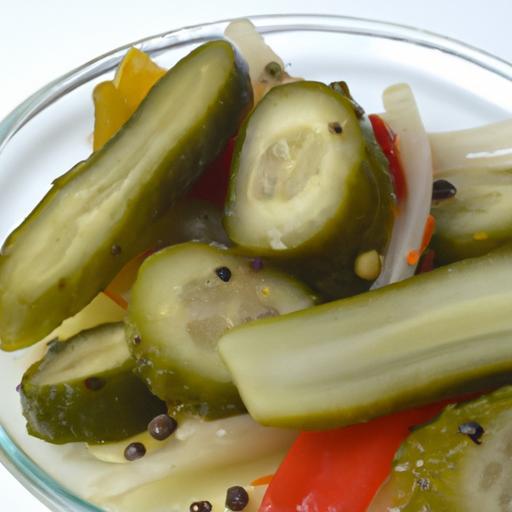
Fermentation is where crisp giardiniera transforms into a zesty, probiotic-packed delight. To achieve the coveted tang and crunch, maintain a cool, dark environment between 60-70°F during fermentation. This slows microbial activity, resulting in gentle, even development without over-softening the vegetables.
Use sterilized glass jars and press the vegetables down firmly beneath the brine, so they remain fully submerged-oxygen exposure leads to spoilage and off-flavors. Check daily for bubbles,a sign of active fermentation,and occasionally burp the jars to release pressure.
after 3-7 days, taste-test for seasoning and texture. Transfer to the refrigerator to halt fermentation and preserve freshness. Properly stored, your homemade giardiniera keeps fresh and flavorful for up to 3 months, ready to enliven sandwiches, antipasti platters, or as a tangy condiment.

Prep and Cook time
- Readiness: 30 minutes
- Fermentation: 3-7 days
- Total Time: Approximately 1 week
Yield
Makes approximately 4 cups of vibrant homemade giardiniera, perfect for serving 6-8 as a relish or appetizer.
Difficulty Level
Easy to medium – Ideal for beginners ready to explore home fermentation with straightforward steps.
Ingredients
- 1 cup celery stalks, sliced
- 1 cup cauliflower florets (bite-sized)
- 1 cup carrots, peeled and sliced
- 1 cup bell peppers (red, yellow, green), diced
- 2 cups distilled white vinegar
- 2 cups filtered water
- 3 tbsp kosher salt
- 2 tsp black peppercorns, cracked
- 1 tbsp mustard seeds
- 1 tsp red chili flakes (adjust to taste)
- 3 fresh garlic cloves, minced
- 2 fresh bay leaves
- 1 tsp dried oregano
Instructions
- Prepare Vegetables: Thoroughly wash and dry all vegetables. Slice celery, carrots, and peppers into uniform pieces; separate cauliflower into small florets.
- Make Brine: In a non-reactive saucepan, combine vinegar, water, and kosher salt. Warm gently, stirring until the salt dissolves completely. Remove from heat and let cool to room temperature.
- Layer the Jar: In a sterilized,wide-mouth glass jar,alternately layer the vegetables and evenly distribute the minced garlic,peppercorns,mustard seeds,chili flakes,bay leaves,and dried oregano.
- Pour Brine: Pour the cooled brine over the vegetables, ensuring they are fully submerged. Press down gently with a wooden spoon or fermentation weight to minimize air pockets.
- Seal and ferment: Seal the jar with a lid that allows gas to escape or burp daily to release pressure. Store the jar in a dark, cool spot (60-70°F) for 3-7 days. Begin tasting after day 3 for preferred texture and tang.
- Refrigerate: Once fermented to your liking, transfer jars to the refrigerator to slow fermentation. Allow resting 24 hours before serving to meld flavors.
Tips for Success
- Uniform cuts ensure even fermentation and consistent crispness.
- If you prefer milder heat, reduce chili flakes or omit.
- For an herbal twist, fresh thyme or rosemary can substitute oregano.
- Use sterilized jars and keep vegetables fully immersed to prevent mold.
- If your giardiniera turns out too salty, rinse lightly before serving or dilute brine next time.
- Don’t rush fermentation-patience rewards with complex, lively flavors.
Serving Suggestions
Homemade giardiniera pickles complement antipasto platters, classic Italian subs, or grilled vegetables beautifully. Try spooning over creamy cheeses like ricotta or mozzarella for a zesty counterpoint. Garnish with fresh oregano sprigs or thin lemon zest curls to brighten presentation. It also pairs wonderfully with roasted potatoes or as a vibrant topping on vegan grain bowls for an instant flavor punch.
| Nutrient | Per 1/4 cup serving |
|---|---|
| Calories | 30 kcal |
| protein | 1 g |
| Carbohydrates | 6 g |
| fat | 0 g |
Explore more shining and crunchy pickling adventures in our Ultimate Guide to Homemade Pickles, or learn about fermentation science from reliable sources like Cultures for Health.
Q&A
Q&A: Crisp & Zesty – How to Make Homemade Giardiniera Pickles
Q1: What exactly is giardiniera, and why is it so popular?
A1: giardiniera is a vibrant Italian-style pickled vegetable medley, bursting with crunchy textures and tangy, zesty flavors. Traditionally, it’s made by pickling an assortment of fresh vegetables-think peppers, cauliflower, carrots, and celery-in a briny vinegar solution infused with herbs and spices.This colorful condiment has won hearts worldwide for its perfect balance of acidity,heat,and crunch,making it a versatile companion for sandwiches,antipasti platters,and salads.
Q2: What vegetables are best for making homemade giardiniera?
A2: The classic lineup includes crisp cauliflower florets, bright orange carrots sliced into sticks, crunchy celery, and vibrant bell peppers in red, green, or yellow. Adding spicy elements like hot cherry peppers or jalapeños can give your giardiniera an extra kick. The key is choosing fresh, firm vegetables to ensure your pickles stay satisfyingly crunchy after soaking in the brine.
Q3: How do you achieve that perfect crispness in homemade giardiniera?
A3: The secret lies in preparation and pickling technique. Start by blanching the vegetables briefly in boiling water-just long enough to brighten their color but not enough to soften them-then instantly plunge them into ice water to lock in that snap.Also, salt plays a role: light salting before pickling draws out excess moisture and enhances crunch. pickling in a cold, vinegar-based brine halts the cooking process, preserving the veggies’ bite and texture.
Q4: What spices and herbs bring giardiniera to life?
A4: Traditional giardiniera shines with a medley of robust seasonings. Think garlic cloves for pungency,black peppercorns for subtle warmth,dried oregano for earthy notes,and red pepper flakes for that signature heat. Mustard seeds, bay leaves, and fresh parsley or thyme can add depth and complexity. the magic happens when these spices mingle and infuse the brine, giving every bite a burst of aromatic zest.
Q5: How long shoudl giardiniera be pickled before it’s ready to eat?
A5: Patience pays off with giardiniera. While you can enjoy it after just 24-48 hours for a bright, sharp tang, the flavors deepen after about a week. For the best balance of zest and mellowed spice, allow your jarred goodness to rest in the refrigerator for at least 7 to 14 days. The longer the wait, the more harmonious and punchy the flavor becomes!
Q6: Can I customize the heat level in my giardiniera?
A6: absolutely! adjusting spice is as simple as tweaking your pepper choices and quantities. Add mild bell peppers for a gentler flavor, or toss in hotter varieties like pickled jalapeños or spicy cherry peppers for a fiery punch. red pepper flakes offer flexible control-start small, and increase to your preferred level of zing.
Q7: What are some creative ways to enjoy homemade giardiniera?
A7: Giardiniera’s versatility is legendary. Serve it as a tangy topping on sandwiches and burgers, sprinkle it over creamy salads for extra crunch, or mix it into grain bowls for a lively punch. It also shines as part of an antipasto spread alongside cheeses and olives, or as a zesty garnish for roasted vegetables and grilled dishes. Wherever a burst of brightness and crunch is welcome, giardiniera fits brilliantly.Q8: How long does homemade giardiniera last, and how should it be stored?
A8: When stored in a clean, airtight jar in the refrigerator, giardiniera can stay fresh and flavorful for up to 1 to 2 months. Always use a clean utensil to remove pickles to avoid contamination. over time,the vegetables may soften slightly,but the tangy,zesty character will remain a delightful addition to your meals.
Q9: Can giardiniera be made without vinegar?
A9: Traditional giardiniera relies on vinegar as the key acidic agent that preserves the vegetables and lends that signature tang. Omitting vinegar changes both texture and flavor,and may compromise safety without proper fermentation methods. For a bright, crisp pickle experience, a vinegar-based brine is your best bet.
Q10: Any tips for beginners trying homemade giardiniera for the frist time?
A10: start with fresh, high-quality vegetables and a simple brine recipe. Don’t rush the pickling time; give your giardiniera the chance to develop full flavor. Keep your jars and utensils spotless to ensure safety. Experiment gradually with spice levels and veggies-each batch is a chance to discover your perfect balance of crispness, zest, and heat!
Final Thoughts
Whether you’re a pickle enthusiast or a curious kitchen adventurer, crafting your own giardiniera opens a vibrant world of crisp, tangy goodness right at home. With simple ingredients and a little patience, you can create this zesty medley that brightens sandwiches, salads, and snacks alike. So next time you crave that perfect crunch and a burst of flavor, remember: homemade giardiniera isn’t just a condiment-it’s a party of bold tastes and culinary creativity waiting to happen in your vrey own jar.Happy pickling!