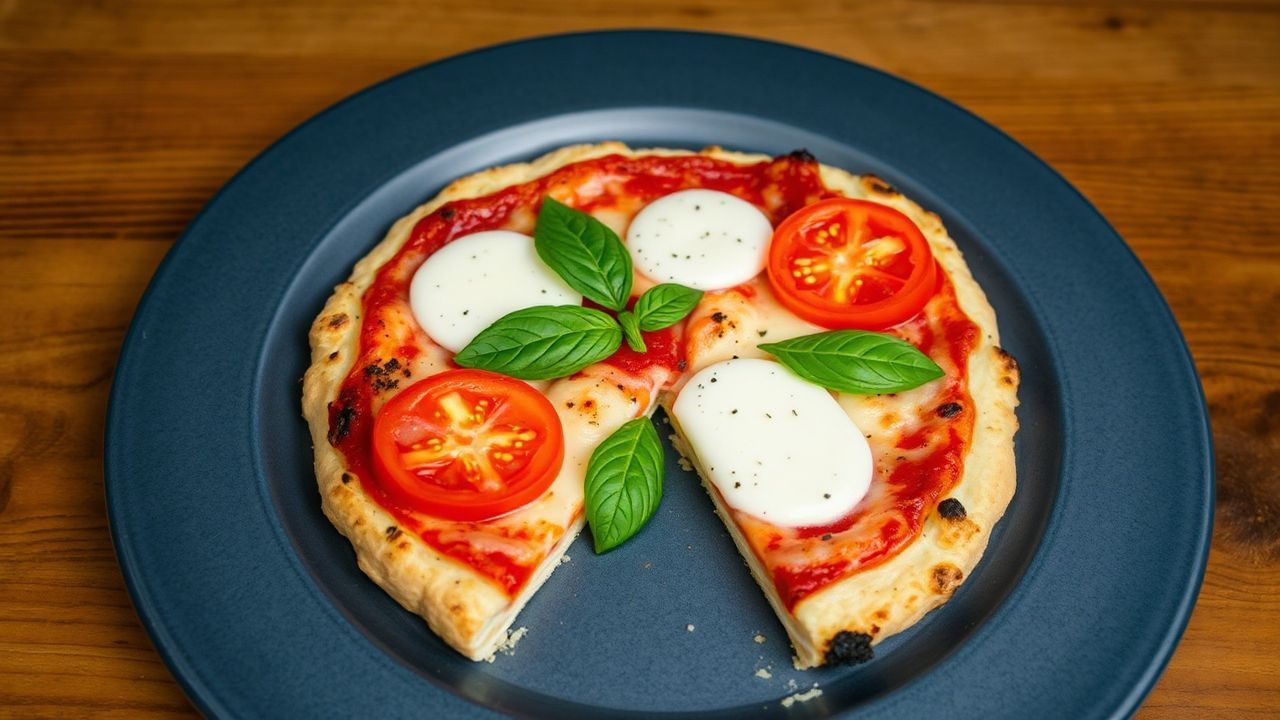
Classic Margherita pizza depends on a simple formula: tangy tomato, fresh basil aroma, and melty mozzarella. A gluten-free Margherita on cauliflower crust can deliver that same comfort—if you treat cauliflower like the main structural ingredient, not a substitute.
- Why Cauliflower Works for Gluten-Free Margherita Pizza
- Ingredients That Taste Like Italy (and Bake Like Pizza)
- Crust ingredients: what each one really does
- Margherita topping ingredients: keep the layer light
- Olive oil: flavor + finishing
- The Best Technique for a Crisp, Sliceable Cauliflower Crust
- Step 1: Rice cauliflower (don’t turn it into paste)
- Step 2: Steam just until soft, then cool slightly
- Step 3: Squeeze aggressively with a towel (this decides crispness)
- Step 4: Mix binders thoroughly for a cohesive crumb
- Parbake Strategy: How to Set the Crust Before Toppings
- Assemble and Finish: The Right Order for Margherita Flavor
- Step 7: Spread tomato sauce in a thin layer
- Step 8: Add torn fresh mozzarella
- Step 9: Final bake just until bubbly
- Full Recipe: Best Gluten-Free Margherita on Cauliflower Crust (10-Inch)
- Common Problems (and Exact Fixes)
- Problem: crust is pale or soft
- Problem: crust cracks while slicing
- Problem: soggy center after toppings
- Problem: cheese doesn’t melt evenly
- Serving Tips That Make It Feel Like a Restaurant
- Nutritional Snapshot (Estimate)
- FAQ
This guide focuses on the two variables that decide success: moisture removal and timed heat. Get those right, and your crust bakes into a sliceable base instead of a soft, fragile disk.
- Squeeze hard: water kills crispness in cauliflower crust.
- Parbake first: set the base before tomatoes hit it.
- Choose two mozzarella textures: structure in the crust, melt on top.
- Finish fast: bubble the cheese, don’t overbake the crust.
Why Cauliflower Works for Gluten-Free Margherita Pizza
Cauliflower has no gluten, so it cannot stretch like wheat dough. Instead, it behaves more like a low-carb vegetable binder: it releases water when heated, then sets when moisture drops and egg/cheese proteins firm up.
That means your job isn’t to “replace gluten.” Your job is to create a stable crumb that bakes into a cohesive layer. When you control moisture and timing, you get the chew-free, crispy bite that still feels like real pizza.
If you want grounding on how plant fibers behave when heated, read about cellulose and other dietary fibers. Cauliflower’s structure relies on these components as the crust dries and firms.
The moisture problem: steam is the enemy
Cauliflower contains mostly water. During baking, that water turns into steam. Steam keeps the interior soft and prevents browning, especially after you spread tomato sauce on top.
That’s why squeezing matters. When you remove water before baking, the crust can brown and form a thin, crisp surface layer. Later, when mozzarella melts, it bonds to that surface instead of soaking it.
Binding happens with egg and cheese
In a gluten-free cauliflower crust, egg and cheese act like a protein-and-fat matrix. As the crust heats, egg proteins coagulate and cheese melts, creating contact points between cauliflower crumbs.
The result: fewer cracks, less crumbling, and better slice shape. For a broader understanding of how proteins behave with heat, you can review protein.
Ingredients That Taste Like Italy (and Bake Like Pizza)
Margherita pizza stays simple by design. You want a bright tomato base, fragrant basil, and mozzarella that melts cleanly. Every ingredient choice should protect crust texture while preserving classic flavor.
A tight ingredient list also helps with reliability. Too many seasonings can mask tomato tang, and too much sauce can flood the crust. Aim for balance: flavor intensity plus structural control.
Crust ingredients: what each one really does
Cauliflower provides the crumb and fiber structure. Egg binds and sets. Mozzarella adds melt and fat; using part-skim in the crust improves browning and stability.
Parmesan boosts savory depth and helps the crust firm up as it bakes. Herbs and garlic powder supply the “pizza” background without turning the recipe into a different style of dish.
For a quick reference on what Parmesan is, you can use Parmigiano-Reggiano. (You’re not required to buy Parmigiano-Reggiano for this recipe, but understanding the style helps you choose a similar hard Italian cheese.)
Margherita topping ingredients: keep the layer light
For Margherita, tomato sauce should taste fresh and tangy, not watery. Crushed San Marzano tomatoes or a thick tomato sauce works best because it spreads without turning the crust soggy.
Use torn fresh mozzarella on top for high-moisture melt and classic “stretch” vibes. Then add fresh basil after baking to protect its aroma and prevent bitterness.
Basil’s flavor changes as it heats. If you want botanical background, see basil. It helps explain why late addition produces better aroma.
Olive oil: flavor + finishing
Extra virgin olive oil ties the flavors together and improves the perception of richness. Drizzle lightly after baking so the crust stays crisp and the oil aromatics stay vibrant.
Olive oil also carries many fat-soluble flavor compounds, which makes its timing matter. You can review olive oil for the basics of why it behaves the way it does in cooking.
The Best Technique for a Crisp, Sliceable Cauliflower Crust
If your cauliflower crust has ever turned soft in the middle, you likely skipped one of the two drying steps. This method builds crispness first, then adds toppings, then finishes only long enough to melt cheese.
Work through the recipe in order. Each phase prevents the next failure: under-dried cauliflower cracks, thick sauce softens the shell, and long final baking dries it out too much.
Step 1: Rice cauliflower (don’t turn it into paste)
Remove the core, chop florets, then pulse in a food processor until the texture resembles rice. Stop before it becomes smooth puree.
Rice-like crumbs hold air pockets. Those pockets help the crust set faster and support even browning. If you puree too fine, the crust can compact and lose crispness.
Step 2: Steam just until soft, then cool slightly
Steam or microwave the riced cauliflower until it turns tender. You’re aiming for soft enough to squeeze, not cooked until dry.
Cooling matters because hot cauliflower releases moisture too aggressively. A brief cool-down lets the texture hold so you can squeeze efficiently.
Step 3: Squeeze aggressively with a towel (this decides crispness)
Transfer cauliflower to a clean kitchen towel or cheesecloth. Twist and squeeze until the flow stops and the mass feels noticeably drier.
This step works because you physically remove water before baking. When steam has less water to form, you get browning and stability instead of a wet interior.
If you want to understand why the crust softens when moisture stays inside, review general moisture behavior in foods. Heating drives phase changes; less free water makes browning more likely and texture more stable.
Step 4: Mix binders thoroughly for a cohesive crumb
Combine squeezed cauliflower, egg, part-skim shredded mozzarella, Parmesan, herbs, garlic powder, salt, and pepper. Mix until you do not see dry cauliflower pockets.
Pressing and mixing create contact between crumbs. That contact point becomes your “gluten-like” structure once the egg and cheese set in the oven.
Parbake Strategy: How to Set the Crust Before Toppings
Parbaking protects the crust. When you bake the base first, you evaporate remaining surface moisture and create a firm shell that resists tomato acidity and extra liquid.
Skipping parbake usually produces two common problems: the crust becomes thin and flimsy, and the center turns soft even if the edges brown.
Step 5: Shape like a pizza, not a thick casserole
Line a sheet pan with parchment. Press the crust mixture into a 10-inch circle about 1/4 inch thick. Make the edges slightly thicker than the center.
Uniform thickness helps it bake evenly. Thick spots may stay soft while thin spots overbake and crack when you slice.
Step 6: Bake until golden and firm
Parbake at 425°F (220°C) on the middle rack for 20–25 minutes. Look for a golden color and a firm, dry surface.
If the top still looks wet or glossy, parbake longer. The crust should feel stable under a light tap.
After parbaking, let the crust rest for 2–3 minutes. That rest time helps the set stabilize before you add wet toppings.
Assemble and Finish: The Right Order for Margherita Flavor
Once the crust sets, your job shifts to layering. Keep the sauce thin, place mozzarella strategically, and finish with short high-heat time.
For classic Margherita, aim for a balanced melt: bubbly mozzarella over tomatoes, with basil added last for aroma.
Step 7: Spread tomato sauce in a thin layer
Spread crushed San Marzano tomatoes (or thick tomato sauce) evenly, leaving a small border at the edge. Don’t pile it high; tomato moisture can creep inward.
Margherita tastes best when the tomato flavor stays bright. A thin layer also makes each bite feel lighter.
Step 8: Add torn fresh mozzarella
Scatter torn fresh mozzarella pieces across the tomato layer. Tears create more surface area for melting and browning.
If you overload mozzarella, you may get steam pockets under the cheese. Spread it evenly but avoid thick clumps.
Step 9: Final bake just until bubbly
Bake 7–10 minutes at 425°F (220°C). Stop when cheese looks melted and bubbly. Don’t chase deep browning—long baking can dry the cauliflower base.
After baking, drizzle extra virgin olive oil lightly and add fresh basil leaves. Slice immediately for the cleanest structure.
Full Recipe: Best Gluten-Free Margherita on Cauliflower Crust (10-Inch)
This recipe targets a crisp, sliceable crust with classic Margherita flavor. It takes about an hour from prep to finish, mostly because drying and parbaking control the texture.
Plan for one 10-inch pizza that serves 2–3 depending on appetite. If you’re feeding more people, double the batch and bake separate crusts for best crisping.
Prep, bake, and yield
Planning time: 25 minutes
Baking time: 30 minutes
Total time: 55 minutes
Yield: 1 pizza (10-inch)
Ingredients
Crust
• 1 medium head cauliflower (about 4 cups riced)
• 1 large egg, lightly beaten
• 1/2 cup shredded part-skim mozzarella
• 1/4 cup grated Parmesan cheese
• 1 teaspoon dried Italian herbs (or oregano + basil + thyme mix)
• 1/2 teaspoon garlic powder
• Salt and freshly cracked black pepper, to taste
Toppings
• 1/2 cup crushed San Marzano tomatoes (or thick tomato sauce)
• 5 oz fresh mozzarella, torn
• Fresh basil leaves, for garnish
• 2 tablespoons extra virgin olive oil
Instructions
1) Rice the cauliflower: Remove core, chop florets, pulse to rice size. Avoid pureeing.
2) Steam and soften: Microwave covered for 4–5 minutes until tender.
3) Cool slightly: Let rest 3–5 minutes so squeezing stays effective.
4) Remove moisture: Squeeze tightly in a towel/cheesecloth until noticeably drier.
5) Mix crust: Combine squeezed cauliflower with egg, part-skim mozzarella, Parmesan, herbs, garlic powder, salt, and pepper.
6) Shape: Press into a 10-inch round, about 1/4-inch thick; thicken the edges.
7) Parbake: Bake at 425°F (220°C) for 20–25 minutes until golden and firm.
8) Add toppings: Spread tomatoes in a thin layer; add torn fresh mozzarella.
9) Final bake: Bake 7–10 minutes until cheese bubbles. Stop while crust stays tender.
10) Finish: Add basil, drizzle olive oil lightly, slice, and serve immediately.
Common Problems (and Exact Fixes)
Cauliflower crust issues come from predictable causes. You can diagnose most failures by looking at the surface color, the bend test, and how the crust behaves after tomato hits it.
Use these fixes while you cook. Small adjustments save the whole pizza.
Problem: crust is pale or soft
Likely cause: insufficient drying or an under-baked parbake. Make sure you squeeze until water stops and bake until the surface looks matte.
Fix: parbake 5–8 minutes longer next time. If already baked, keep toppings thinner and avoid thick sauce.
Problem: crust cracks while slicing
Likely cause: crumb mix too dry or edges too thin. Cauliflower crumbs need enough binding to set across the full thickness.
Fix: mix thoroughly and keep edges slightly thicker. Also avoid overbaking the parbake until it turns too dry.
Problem: soggy center after toppings
Likely cause: watery tomato layer and steam trapped inside the crust. Even a well-parbaked base can soften if sauce floods it.
Fix: spread sauce thin and choose thick tomato sauce. Consider draining canned crushed tomatoes and using just the thicker portion.
Problem: cheese doesn’t melt evenly
Likely cause: uneven mozzarella distribution or too much final bake time that dries the surface. Fresh mozzarella melts quickly; it needs an even layer.
Fix: tear mozzarella into smaller pieces and spread across the tomato surface. Final bake should stop when bubbling begins, not when cheese browns hard.
Serving Tips That Make It Feel Like a Restaurant
Gluten-free cauliflower crust gets best results when you plan the timing. Serve immediately, keep sides bright, and use simple garnishes that complement basil and tomato.
Think in contrast: crisp crust plus fresh salad. The flavor stays clean and the meal feels lighter.
Serve at the right moment
Slice and serve right after the final bake. The crust sets as it cools, but it also risks losing crispness if you wait too long.
If you must wait, re-warm slices in a hot oven briefly. That restores some surface crispness.
Pair with a bright, acidic side
An arugula salad with cherry tomatoes works well. Add lemon-forward dressing to sharpen tomato flavors and cut through mozzarella richness.
Acidity also balances the mild, slightly sweet notes cauliflower can bring. Lemon keeps each bite tasting fresh.
Nutritional Snapshot (Estimate)
Nutrition varies by brands and portion size. This estimate assumes standard amounts listed above and typical mozzarella fat levels.
Per serving (approx.): 320 kcal, 22 g protein, 15 g carbohydrates, 18 g fat.
FAQ
What makes a cauliflower crust a great base for gluten-free Margherita?
Cauliflower crust provides a gluten-free foundation with mild flavor. When you remove water and parbake properly, egg and cheese bind the crumbs into a sliceable base that supports tomato sauce and mozzarella.
Texture depends on two steps: squeezing for dryness and parbaking to form a firm shell before toppings.
How do I keep the crust from turning soggy?
Squeeze the steamed cauliflower until it feels noticeably drier than you expect. Then parbake until golden and firm, so the crust forms a protective layer.
Finally, keep the tomato layer thin and use thick sauce rather than watery canned tomatoes.
Which mozzarella should I use for the best Margherita melt?
Use part-skim shredded mozzarella in the crust mixture for binding and browning. Use fresh mozzarella (torn) on top for classic melt and flavor.
This combo improves structure without losing the Margherita signature cheese experience.
Can I make this dairy-free or vegan?
Yes, but you must choose dairy-free cheeses that melt and set well. Many vegan mozzarellas melt differently, so expect a slightly softer crust if your binder doesn’t firm up like egg and mozzarella.
Moisture control and parbaking still matter most, regardless of cheese choice.
How long does it take to make this gluten-free Margherita?
Total time usually lands around 55 minutes. You’ll spend most of that time on steaming, squeezing, and parbaking—steps that directly improve crunch and sliceability.
If you prep ingredients ahead, active time drops, but baking timing remains the key for crisp results.
See also: gluten-free Margherita